When you’re configuring Kubernetes applications, they can get complex. Depending on how many microservices you have, you could be dealing with multiple Kubernetes manifests that include deployments, services, ConfigMaps, secrets, and a lot more. With all of the Kubernetes manifests that you have to manage comes another level of complexity for a cloud-native environment.
The idea behind Helm is to make your life a bit easier and remove some of those complexities. To package up all of the Kubernetes manifests and deploy them as “one”.
In this blog post, you’ll learn about what Helm is, why it’s used, its benefits, and how to use Helm in your environment today.
Prerequisites
To follow along with this blog post, you should have:
- Helm installed. To do that, you can follow this link. The link will take you to an install page that works for any operating system. Once it’s installed, you’re good to go to follow this blog post.
What Is a Helm Chart?
Have you ever used Linux? If so, you may have seen commands like apt or yum to update and install applications or frameworks. Although apt and yum appear to just be commands on a terminal, they’re far more than that. They’re package managers. Package managers are a collection of software tools and programs that automate the process of updating, deleting, and installing software. It’s essentially a collection of software that you can use from one location.
That’s exactly what Helm charts are.
Helm is a package manager, but for Kubernetes applications. It allows you to have a one-stop-shop for an entire application running on Kubernetes. It doesn’t matter if the application has two Kubernetes manifests or twenty. Helm packages it up in one central location for you to use later on.
Helm Chart Benefits
In the previous section, you learned about what Helm is and what it does. Now that you have the fundamental understanding of Helm, let’s talk about a use case.
As an example, say your company wants to containerize and orchestrate the company website. To do this in Kubernetes, there will be a few pieces that have to come together. First, you’ll need to create the Kubernetes manifests for the website. Perhaps it’s running on WordPress, so you’ll need Kubernetes manifests for:
- Secrets
- The WordPress deployment
- The WordPress service
Then, you’ll need a way to store the data from the website, so perhaps you’re using MySQL as the database backend. That means you’ll also need another set of Kubernetes manifests for:
- Secrets
- The MySQL deployment
- The MySQL service
- The MySQL volumes
- Stateful sets
Counting all of the manifests up, you’re looking at roughly 7-10 Kubernetes manifests plus any other dependencies that are needed like the website application itself. It’s a lot of management and overhead just to get a website up and running.
Instead of doing all of that, you can package up all of those Kubernetes manifests into one location that contains one package. Then, you can deploy that package on any Kubernetes environment instead of running manifests one by one.
Long story short; a bundle of Kubernetes manifests is a Helm chart.
Helm Architecture
Now that you know the benefits of Helm, let’s take a look at its architecture. First things first, the best way to learn is by doing. Let’s create a Helm chart.
Open up a terminal and create a new directory called myapp by running the following command:
mkdir myappNext, change the directory (cd) into the myapp directory by running:
cd myappNow that you’re in the working directory, you can create a Helm package template by running the helm create command.
For the purposes of this blog post, you can choose any app name you want. I’ll call mine wordpress
helm create app_nameOpen up the myapp directory and you should see an output similar to the screenshot below.
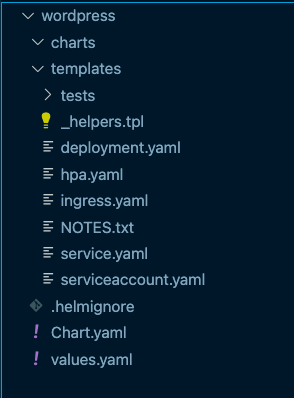
As you can see, there are a lot of pre-populated Kubernetes manifests. You have a service manifest, deployment manifest, and a few others. Of course, you can modify these. The manifests you see are simply examples/templates.
Open up the deployment.yaml manifest and you’ll see code similar to the screenshot below.
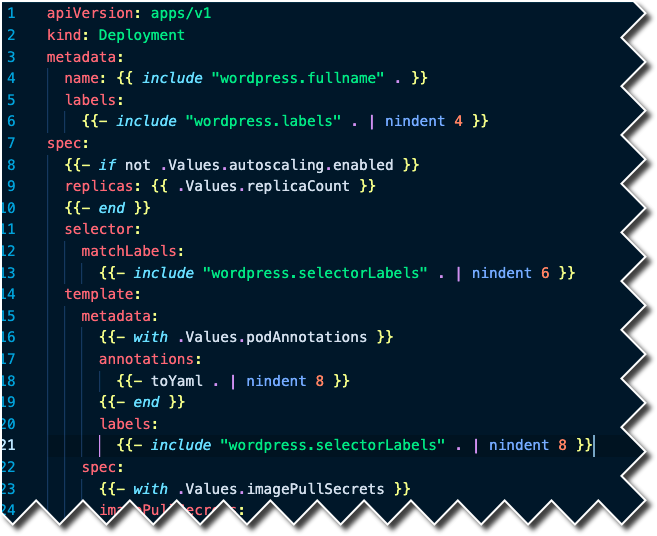
The power of Helm, other than packaging up multiple Kubernetes manifests, is with repeatability using Values. If you look at lines 9 and 16 in the screenshot above, you’ll see a .Values keyword. That points to the values.yaml manifest, which contains all of the values for an application.
How CloudTruth Makes Managing a Helm Chart Easier
Let’s take a look at a snippet of the values.yaml Helm chart:
replicaCount: 1

image:
  repository: nginx
  pullPolicy: IfNotPresent
  tag: ""
As you can see, there are four values that you have to add:
- Replica count
- Repository for the container image
- The pull policy
- The tag of the container image
That’s only four of the values that could possibly be needed to make your application run. There are most likely at least 15-20 more values that you’ll need to add for things like ports, secrets, services, and more.
The three primary questions are:
- How do you manage all of those values if they need to be changed?
- How do you manage all of the different values across development, staging, production, and any other stages that you have?
- How do you deploy via CICD across multiple environments with all of the needed values that most likely change often?
That’s where CloudTruth comes into play.
With CloudTruth, you can store the values for your replica, repo, pull policy, and tag. You can even modify and change the values for each stage/environment that you need to deploy to. That way, you can have an easy location to update all values and control what’s being deployed and where.
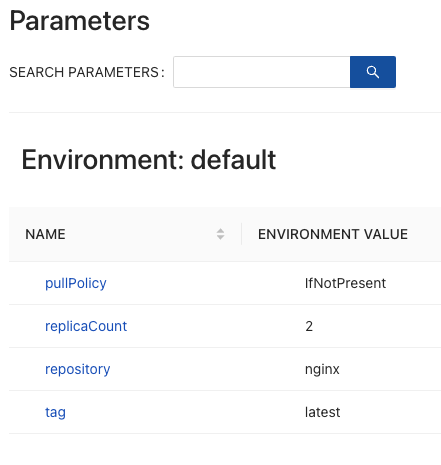
If you’re interested in testing out CloudTruth for free, feel free to sign up at the link here.
Join ‘The Pipeline’
Our bite-sized newsletter with DevSecOps industry tips and security alerts to increase pipeline velocity and system security.

